


How To Use Canva to Create Brilliant Backgrounds, Tweak Designs & Perfect Presentations?
- Filipino Virtual Assistance
- Jul 22, 2018
- 4 min read

You may already know that eye-catching visuals are essential to enhancing your website and your brand image. To do this you can use inexpensive tool or the one that is free.
PowerPoint and Keynote offer many options for presenters, as do other but where can a marketer go to up the ante without needing extensive experience or a visual design team? We find Canva a user-friendly platform and effective to make a new Slide Share, Facebook theme or other social post. It saves time and allows you to make visually appealing, professional-style graphics on demand. Here are the simple steps to get you started with Canva
How to Set Up an Account
This step is very easy. Enter your e-mail and a password and Canva brings you right to “Your Designs” home page.

How to Choose Type of Presentation?
Choose what you want to create from a variety of presentation options. We love Canva’s social media layout — it leaves ample room to build pages in creative ways. The variety of layout options gives you room to create from scratch or use and manipulate Canva’s pre-made layouts. These existing layouts make the difference from spending two hours creating an interesting layout and taking five minutes to whip up something beautiful.

Steps On How To Make Perfect Presentation
Your title sets the mood for the rest of your presentation. Use the same fonts, colors and imagery throughout
Match the text design by changing the colors and arrange the text
Change the title into content pages by moving the background and tittle to make space for your title
For the content, ensure your text doesn’t crowd the page and is away from the edges of the slides
Limit the amount of test on your page. Aim to have a minimum size of 30.
How to Use the Sidebar?
Canva’s sidebar is where you will find all of your editing tools. The “Layouts” tab provides those pre-made designs you can change as necessary layer by layer, while the “Background” tab leaves you with a more basic template to build from. The “Text” tab has a multitude of text boxes to choose from, and the “Upload” tool allows you to add new images if you don’t find anything in the “Search” tab that will work.

Steps On How To Make Brilliant Background
Choose photos where text can easily be contrast with the background, Choose image with enough clear spaces to overlay text
Make text stand out by placing transparent shape over an image, Move the transparent shape over the image
Add a border to focus your content, Look through Canva’s line section find a boarder and then add
Use a low transparency icon to subtly fill empty spaces, Change the transparency of the icon to 30
Create your own textures by cropping photos, Crop the image to leave a square text that could be use as background
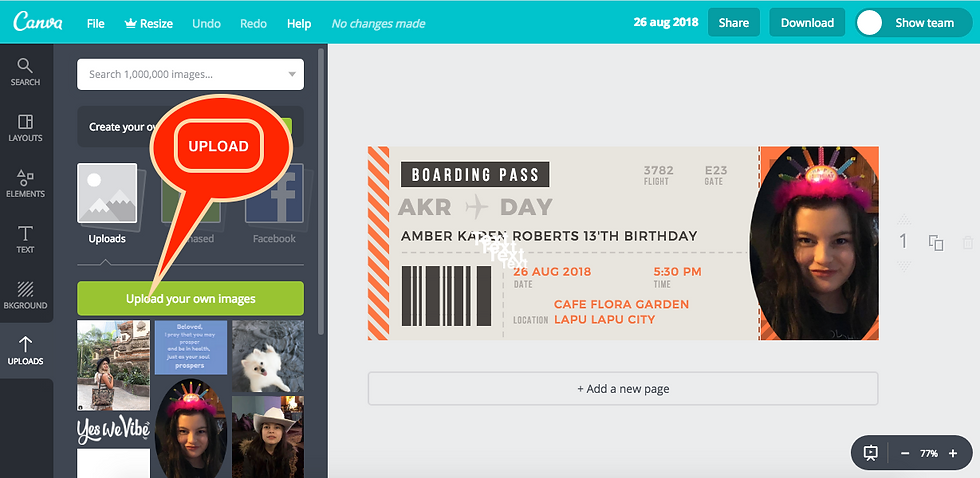
How to Upload Your Own Photos?
You can upload original or stock photos for a presentation with ease. Your images become readily available in the sidebar under “Uploads.” One great feature on Canva: Your images are saved the moment they are created, so there is no need to worry about closing out of a tab without saving.
Once images are integrated into your sidebar, you have the option of layering images (Canva’s or your own) on top of each other and the ability to sort and move layers. This can be really helpful when you are trying to place your company logo on the slide.
Steps On How To Tweak Design
Correct the text positioning and make the photos match
Simplify the design and rearrange the text
Change the fonts to be more appropriate for the content
Adjust the text colors to match the background image
How to Insert Text?
Creating text can be done in a number of ways. You can utilize the supplied banners or place text boxes where you need. For the second option, drag your text box onto your slide, placing it where you want. Select the box and a text editing bar will appear. Here you can change font, size and color of the text.

CHOOSE THE RIGHT FONT
The Key of choosing fonts is contrast. A Bold Title and a lighter subtitle
Sentence case title, Try ALL CAPS SUBTITLE
Size matters when people look at your design, they should know what to read first. Make sure the title is the largest font, then your subtitle, then your body font. Resize the fonts
Readability ensure your body font is simple and easy to read
Always choose the font that emphasized your message
“If you make everything bold, then nothing is bold.” — ART WEBB
How to Copy Your Slide?
Copying is one of the more significant functions that makes your life easier. After you have completed a slide and it is formatted to your liking, look to the right of the slide you are working on. You should see an icon depicting slides layered on top of each other (see image below); click that. This will create an exact replica for you to copy as you need to generate new slides. You’ll also see the “Trash” icon right below. Don’t freak out if you accidentally send a slide to the garbage — it’s easily retrievable with the “Undo” function.

How to Export?
When you’re ready to send this piece out into the world, reach for the “Link & Publish” button in the top right corner of your page. This will generate a pop-up screen, asking if you would like it exported as an Image or a PDF. Choose one and save accordingly.

“What makes content engaging is relevancy.” — GAIL GOODMAN
For comments and suggestions please CONTACT US.
Comments